Creating New Outlets
- Updated:
Create new outlets for Tecton extensions
In order to facilitate extending Q2's platforms in a safe and effective manner, we've provided hooks in each platform's markup called "outlets." Outlets are components that, in conjunction with the q2-tecton-platform package, generate an iframe and code to pass data between the iframe and the host platform outside it.
Adding new outlets gives extension authors new places to put their work. There are currently four kinds of outlets:
- feature
- widget
- tab
- contextual menu (aka q2-dropdown).
You can even nest outlets inside of extensions.
Specifying which extension ends up in which outlet is the result of a combination of an extension author's config, a platform maintainer's addition of outlets, an FI's theme file (in the case of widgets), and the FI's configuration files (saved in their database). For more info, check out our guide to configs.
This guide will examine how to set up each of the outlet types and how to configure extensions to use those outlets. It will also list or reference existing outlets in supported platforms.
In various places in our docs and code we reference the concept of a "legacy" approach. This typically refers to places where code will live alongside, but outside, Tecton's micro-frontend paradigm during the transition to a fully micro-frontend approach.
Feature Outlet
Tecton feature outlets take up the main content area of a page in a platform, and thus typically also require space in that platform's navigation. Feature outlets are the most common host for extensions.
Widget Outlet
Widget outlets are currently only present in Q2's Online Banking platform. These extensions fit into the existing "widget rail" system.
Tab Outlet
Tecton tab outlets, as their name suggests, allow extension authors to add tabs to q2-tab-container's. Tab outlets need to specify the name, context, contextValue, and optionally additionalContext. Then FIs can configure installed extensions to use that space.
Here is a video explaining how you can manage this through the Tecton CLI:
How to configure a tabbed outlet in UUX using the Tecton CLI
How it works
Outlet implementers add a context attribute to an outlet. This is the lowest acceptable context for that outlet. For example, if an implementer specifies Account::Deposit, only subtypes of Deposit will be allowed in that slot.
<tecton-tabbed-outlet name='tabs' context='Account::Deposit' contextValue={{model.id}} additionalContext={{model.productId}} min-height='450px'></tecton-tabbed-outlet>They also add the name and context of that outlet to the meta section of the config for the parent extension (or platform) of that outlet.
{
  meta: {
    outlets: {
      tabs: {
        resolveType: 'tab',
        shape: 'Content',
        context: 'Account::Deposit',
      }
    }
  }
}
Extension authors provide a context in the meta section of their config that's on the same branch of the context tree, and at least as specific, as the outlet. For example, If the author of an extension set their context to Account::Savings, it would only appear when the account passed to contextValue is a savings account. And this would work because Savings is a subtype of Deposits. If they set it to a different branch of the tree, say Account::Installment, the extension would never match its parent outlet and therefore never appear.
{
  "meta":{
    "type":{
      "shape": "Content",
      "context": "Account::Savings"
    }
  }
}
When figuring out which extension to show, what we call "resolving" the extension, Tecton gets the config for that outlet, finds the context, looks up the extensions configured for that outlet, gets their contexts, and finally gets the contextValue and finds its account type. Then it compares. The most specifically matched extension for that account type gets shown. If none match, nothing gets loaded.
Let's look at a complete config as it would come from the database. Most configs are a mixture of what the extension author specifies in their configuration folder, merged with what the FI has set their configuration to in the database.
{
  "AccountDetails": {
    "core": true,
    "routeName": "AccountDetails",
    "legacyRouteName": "account",
    "legacy": true,
    "modules": {
      "main": {
        "primary": true,
        "overpanel": false,
        "navigable": true,
        "routeConfig": {
          "featureName": "AccountDetails",
          "moduleName": "main",
          "configuredOutlets": {
            "tabs": [
              {
                "tabLabel": "transactions",
                "modules": [
                  {
                    "featureName": "Transactions",
                    "moduleName": "main"
                  }
                ]
              },
              {
                "tabLabel": "details",
                "modules": [
                  {
                    "featureName": "GoalBasedPlanning",
                    "moduleName": "goalDetails"
                  }
                ]
              }
            ],
            "accountActionsDropdown": [
              {
                "itemLabel": "Canary",
                "action": "navigateTo",
                "modules": [
                  {
                    "featureName": "TectonCanary",
                    "moduleName": "Canary"
                  }
                ]
              }
            ]
          }
        },
        "meta": {
          "moduleName": "main",
          "featureName": "AccountDetails",
          "type": {
            "shape": "Content",
            "context": "None",
            "overpanelReady": false
          },
          "params": {
            "accountId": {
              "type": "string",
              "replace": true
            }
          },
          "outlets": {
            "tabs": {
              "resolveType": "tab",
              "shape": "Content",
              "context": "Account::Q2Account",
              "required": false,
              "declaredTabs": [
                {
                  "tabLabel": "transactions",
                  "allowOverride": false
                },
                {
                  "tabLabel": "details",
                  "allowOverride": true
                }
              ]
            }
          }
        }
      }
    }
  }
}
Contextual Menu Outlet
The contextual menu outlet allows extension authors and platform owners to add <q2-dropdown-item> elements inside of a <q2-dropdown> which can then navigate to one of the modules in their feature.
These dropdown items are added after existing items, so extensions configured to appear here will be displayed last.
How to create a Contextual Menu Outlet
To implement a contextual menu outlet of your own, you'll first need a q2-dropdown. Be sure to add a name attribute, so your dropdown can be targeted in the configuration, and a context attribute, to tell Tecton the circumstances of the outlet.
For now, context is limited to account pages, so unless the menu is on an account page this should simply be set to "None". For an enumeration of the account types you can provide, see the above contexts section of the tabs outlet.
Optionally you can also include the context-value attribute to provide data the extension might need and additional-context to allow for additionalContextRequirements to be set for a module. For example, you might want to provide the account ID for the account on the current page so Tecton knows which account-specific extension to show, and the product ID so that menu items can be setup to only show on certain products.
<q2-dropdown
  name='MyFeature.Main.AccountMenu'
  context='Account::Q2Account'
  context-value='{accountId}'
  additional-context='{productId}'
></q2-dropdown>
Once you've added those details to the q2-dropdown, you'll also need to define the existence of the outlet in your configuration.
{
  "MyFeature": {
    "modules": {
      "Main": {
        "meta": {
          "moduleName": "Main",
          "featureName": "MyFeature",
          "type": {
            "shape": "Content",
            "context": "None"
          },
          "outlets": {
            "AccountMenu": {
              "resolveType": "menu",
              "shape": "Content",
              "context": "Account::Q2Account"
            }
          }
        }
      }
    }
  }
}
How to Add an Item to a Contextual Menu Outlet
The first thing to do is look up the menu you want to add items to. To do this, navigate to the q2-dropdown and look it up in your browser's dev tools. Look for its name and context attributes. If it doesn't have those you'll need to request the addition of that outlet for your chosen platform.
If the menu is an outlet you control (i.e., it's in your extension), you'll simply add the itemLabel (what you want the menu item to say) and action (i.e., what you want it to do), and the modules you want to appear config under the routeConfig block.
Actions are currently limited to "navigateTo" and "showOverpanel" and are entered as strings, not function calls.
{
  "FeatureIWantToLinkTo": {
    "modules": {
      "Main": {
        ...
      }
    }
  },
  "MyFeature": {
    "modules": {
      "Main": {
        "routeConfig": {
          "configuredOutlets": {
            "AccountMenu": [
              {
                "itemLabel": "My Feature Link",
                "action": "navigateTo",
                "modules": [
                  {
                    "featureName": "FeatureIWantToLinkTo",
                    "moduleName": "Main"
                  }
                ]
              }
            ]
          }
        }
      }
    }
  }
}
If you want to add to an extension you don't own, say in an outlet on the platform, you'll first want to make sure your extension's context matches the context of the outlet. See above for a discussion on context. Then you'll need to have support configure the outlet owning extension's config to match.
How to utilize context-value
In instances where you want to use the context of an outlet (i.e., the value of context-value on the q2-dropdown), you will need to tell the outlet how you want to receive that context via the configuration. We do this via by utilizing params and contextIdParamName.
In the module we want to open, we need to have a parameter set up that the outlet can pass the context as.
{
  "FeatureIWantToLinkTo": {
    "modules": {
      "Main": {
        "meta": {
          "params": {
            "accountId": {
              "type": "string",
              "replace": true
            }
          }
        }
      }
    }
  }
}
Next, we just need to tell the outlet the name of the parameter we want to use (i.e., "accountId") by providing the contextIdParamName.
{
  "MyFeature": {
    "modules": {
      "Main": {
        "routeConfig": {
          "configuredOutlets": {
            "AccountMenu": [
              {
                "itemLabel": "My Feature Link",
                "action": "navigateTo",
                "contextIdParamName": "accountId",
                "modules": [
                  {
                    "featureName": "FeatureIWantToLinkTo",
                    "moduleName": "Main"
                  }
                ]
              }
            ]
          }
        }
      }
    }
  }
}
Now, when you navigate to the feature via the q2-dropdown, you will have the context provided by the dropdown as the param that you specified. You can get the value of this param by using the paramsChanged source, or my referencing self.form_fields['tct-ctxid'] in Python.
Customizing context-value with tct-ctxid
By default, the context that is passed to your feature will be whatever is set as the context-value on the <q2-dropdown>. But what if you want to provide your own custom value? Or what if one is not provided at all? This is where the tct-ctxid property comes in.
By providing this attribute in your configuration, you can provide a custom property value to your feature. To utilize it, just add a tct-ctxid property next to your contextIdParamName property in the configuration.
{
  "MyFeature": {
    "modules": {
      "Main": {
        "routeConfig": {
          "configuredOutlets": {
            "AccountMenu": [
              {
                "itemLabel": "My Feature Link",
                "action": "navigateTo",
                "contextIdParamName": "accountId",
                "tct-ctxid": "My custom value",
                "modules": [
                  {
                    "featureName": "FeatureIWantToLinkTo",
                    "moduleName": "Main"
                  }
                ]
              }
            ]
          }
        }
      }
    }
  }
}
Now, when you navigate to the feature via the q2-dropdown, the value of the property you set for contextIdParamName will be the value you set for tct-ctxid.
{
  "accountId": 'My custom value'
}
Special Considerations for Platform Implementers
Implementers of outlets at the platform level (aka outside extensions) require some additional knowledge about how Tecton boots up to make good choices. This is where the "legacy" approach mentioned above comes in. And a good example of this is the Account Details page of UUX.
Account Details isn't an extension. But it contains tabs and menus we need to reference in our config so they can be extended. Which is why the name field for outlets on this page includes "AccountDetails.main" before the outlet name: to give Tecton's resolution code the right nodes to move along in the config tree to resolve the configuration for just that spot.
Let's look at the UUX boilerplate config for AccountDetails to see what Tecton is going to map over to find the right extension. You can also access the boilerplate at any time in your dev tools under the Q2_CONFIG.tecton global.
{
  "AccountDetails": {
    "core": true,
    "routeName": "AccountDetails",
    "legacyRouteName": "account",
    "legacy": true,
    "modules": {
      "main": {
        "primary": true,
        "overpanel": false,
        "navigable": true,
        "routeConfig": {
          "featureName": "AccountDetails",
          "moduleName": "main",
          "configuredOutlets": {
            "accountActionsDropdown": [
              {
                "itemLabel": "Canary",
                "action": "navigateTo",
                "modules": [
                  {
                    "featureName": "TectonCanary",
                    "moduleName": "Canary"
                  }
                ]
              }
            ]
          }
        },
        "meta": {
          "moduleName": "main",
          "featureName": "AccountDetails",
          "type": {
            "shape": "Content",
            "context": "None",
            "overpanelReady": false
          },
          "params": {
            "accountId": {
              "type": "string",
              "replace": true
            }
          },
          "outlets": {
            "accountActionsDropdown": {
              "resolveType": "menu",
              "shape": "Content",
              "context": "Account::Q2Account"
            }
          }
        }
      }
    }
  }
}
Notice that this contains more details than the config you provide in an extension's config. That's because it gets combined with the configuration from the database. It's made so FIs can specify which extensions go where and under what names. This should be up to the FI, not the extension author.
So we've got a fake extension in the config called AccountDetails with a module of main. That's where "AccountDetails.main" comes in. By including that in the name field of the outlet, we've given Tecton the right directions to parse down this tree and look for configured outlets. We could have called it whatever we want (e.g., "Spam.Eggs"). Then, as long as the configuration Tecton is going to get back from the database includes that as a feature and module, it'll know where to find the configured outlets.
This module has a menu outlet called accountActionsDropdown and specified its context as any Q2Account. It's also got a configuration for that outlet (in its routeConfig) that specifies one additional menu item that points to Tecton Canary, assuming TectonCanary also has a matching context.
Keep in mind, if you add outlets to the platform you will need to also add a database migration so that all FIs get the configuration required to use it.
Outlet Context
What is Context?
Context is made to allow outlet implementers, extension authors, and FIs the ability to control which extensions appear under what circumstances. The context system does this by comparing outlet configuration, extension configuration, contextValue, and a tree of contexts — all of which we'll explore in detail.
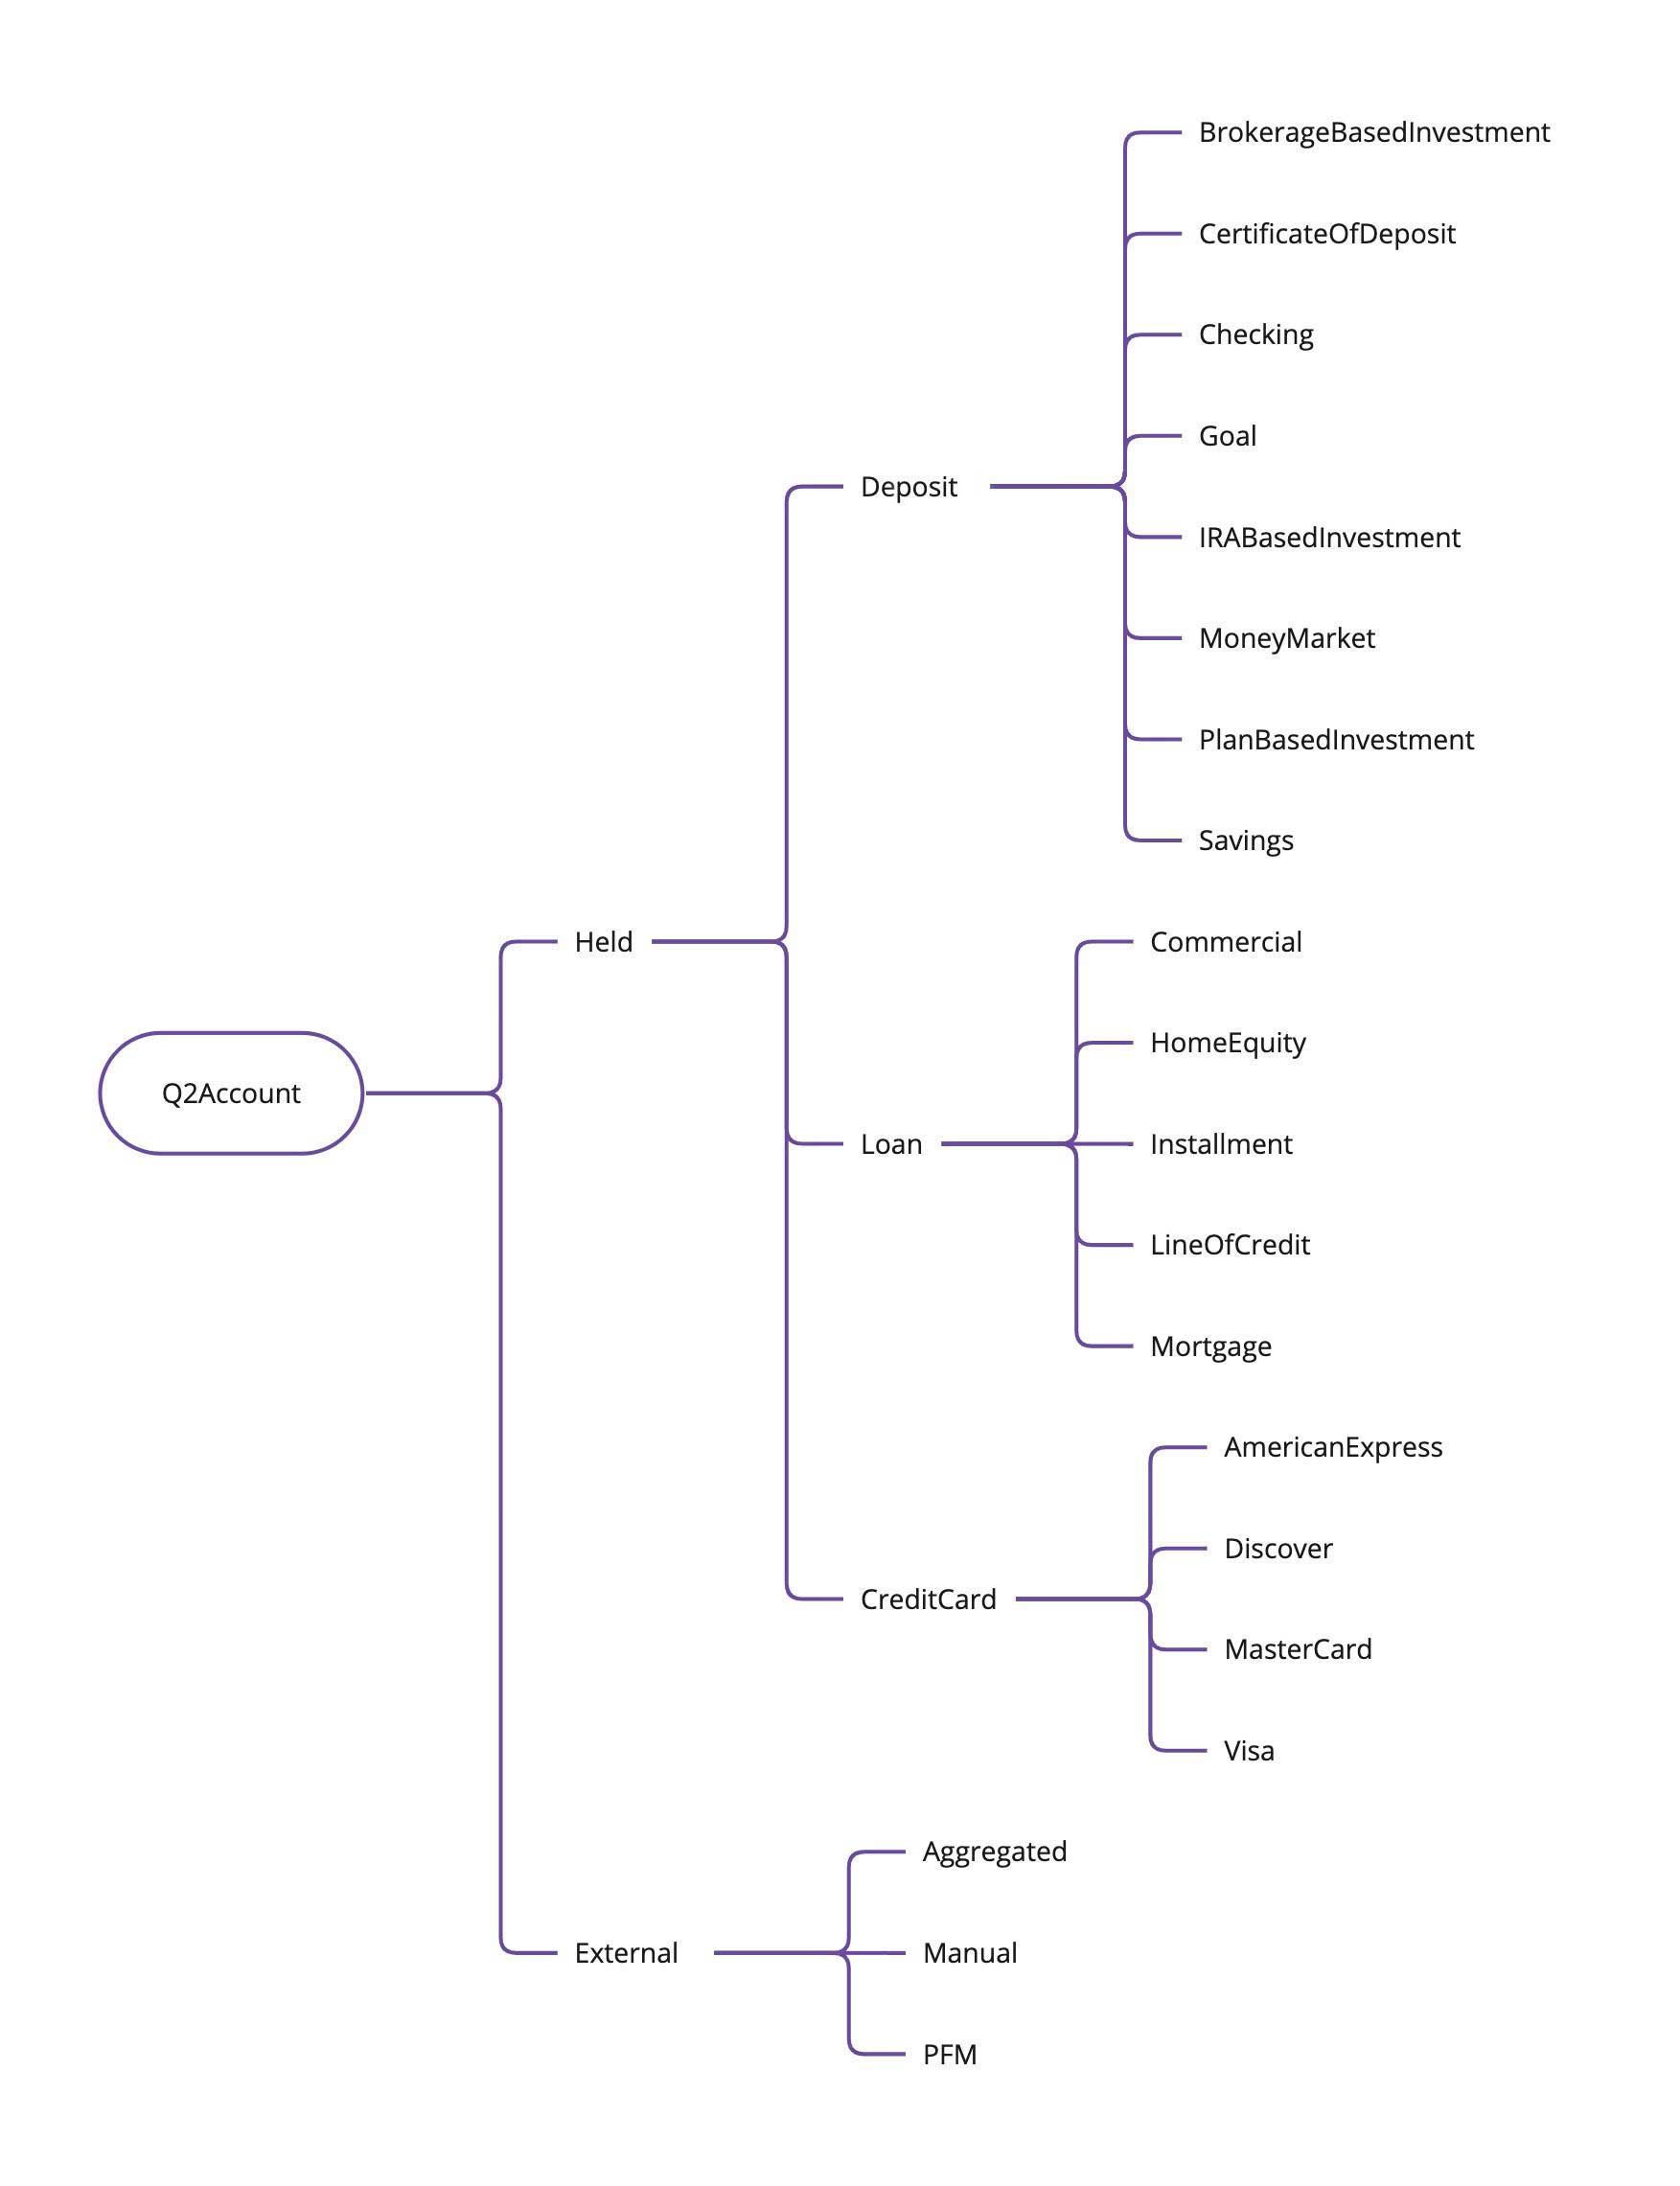
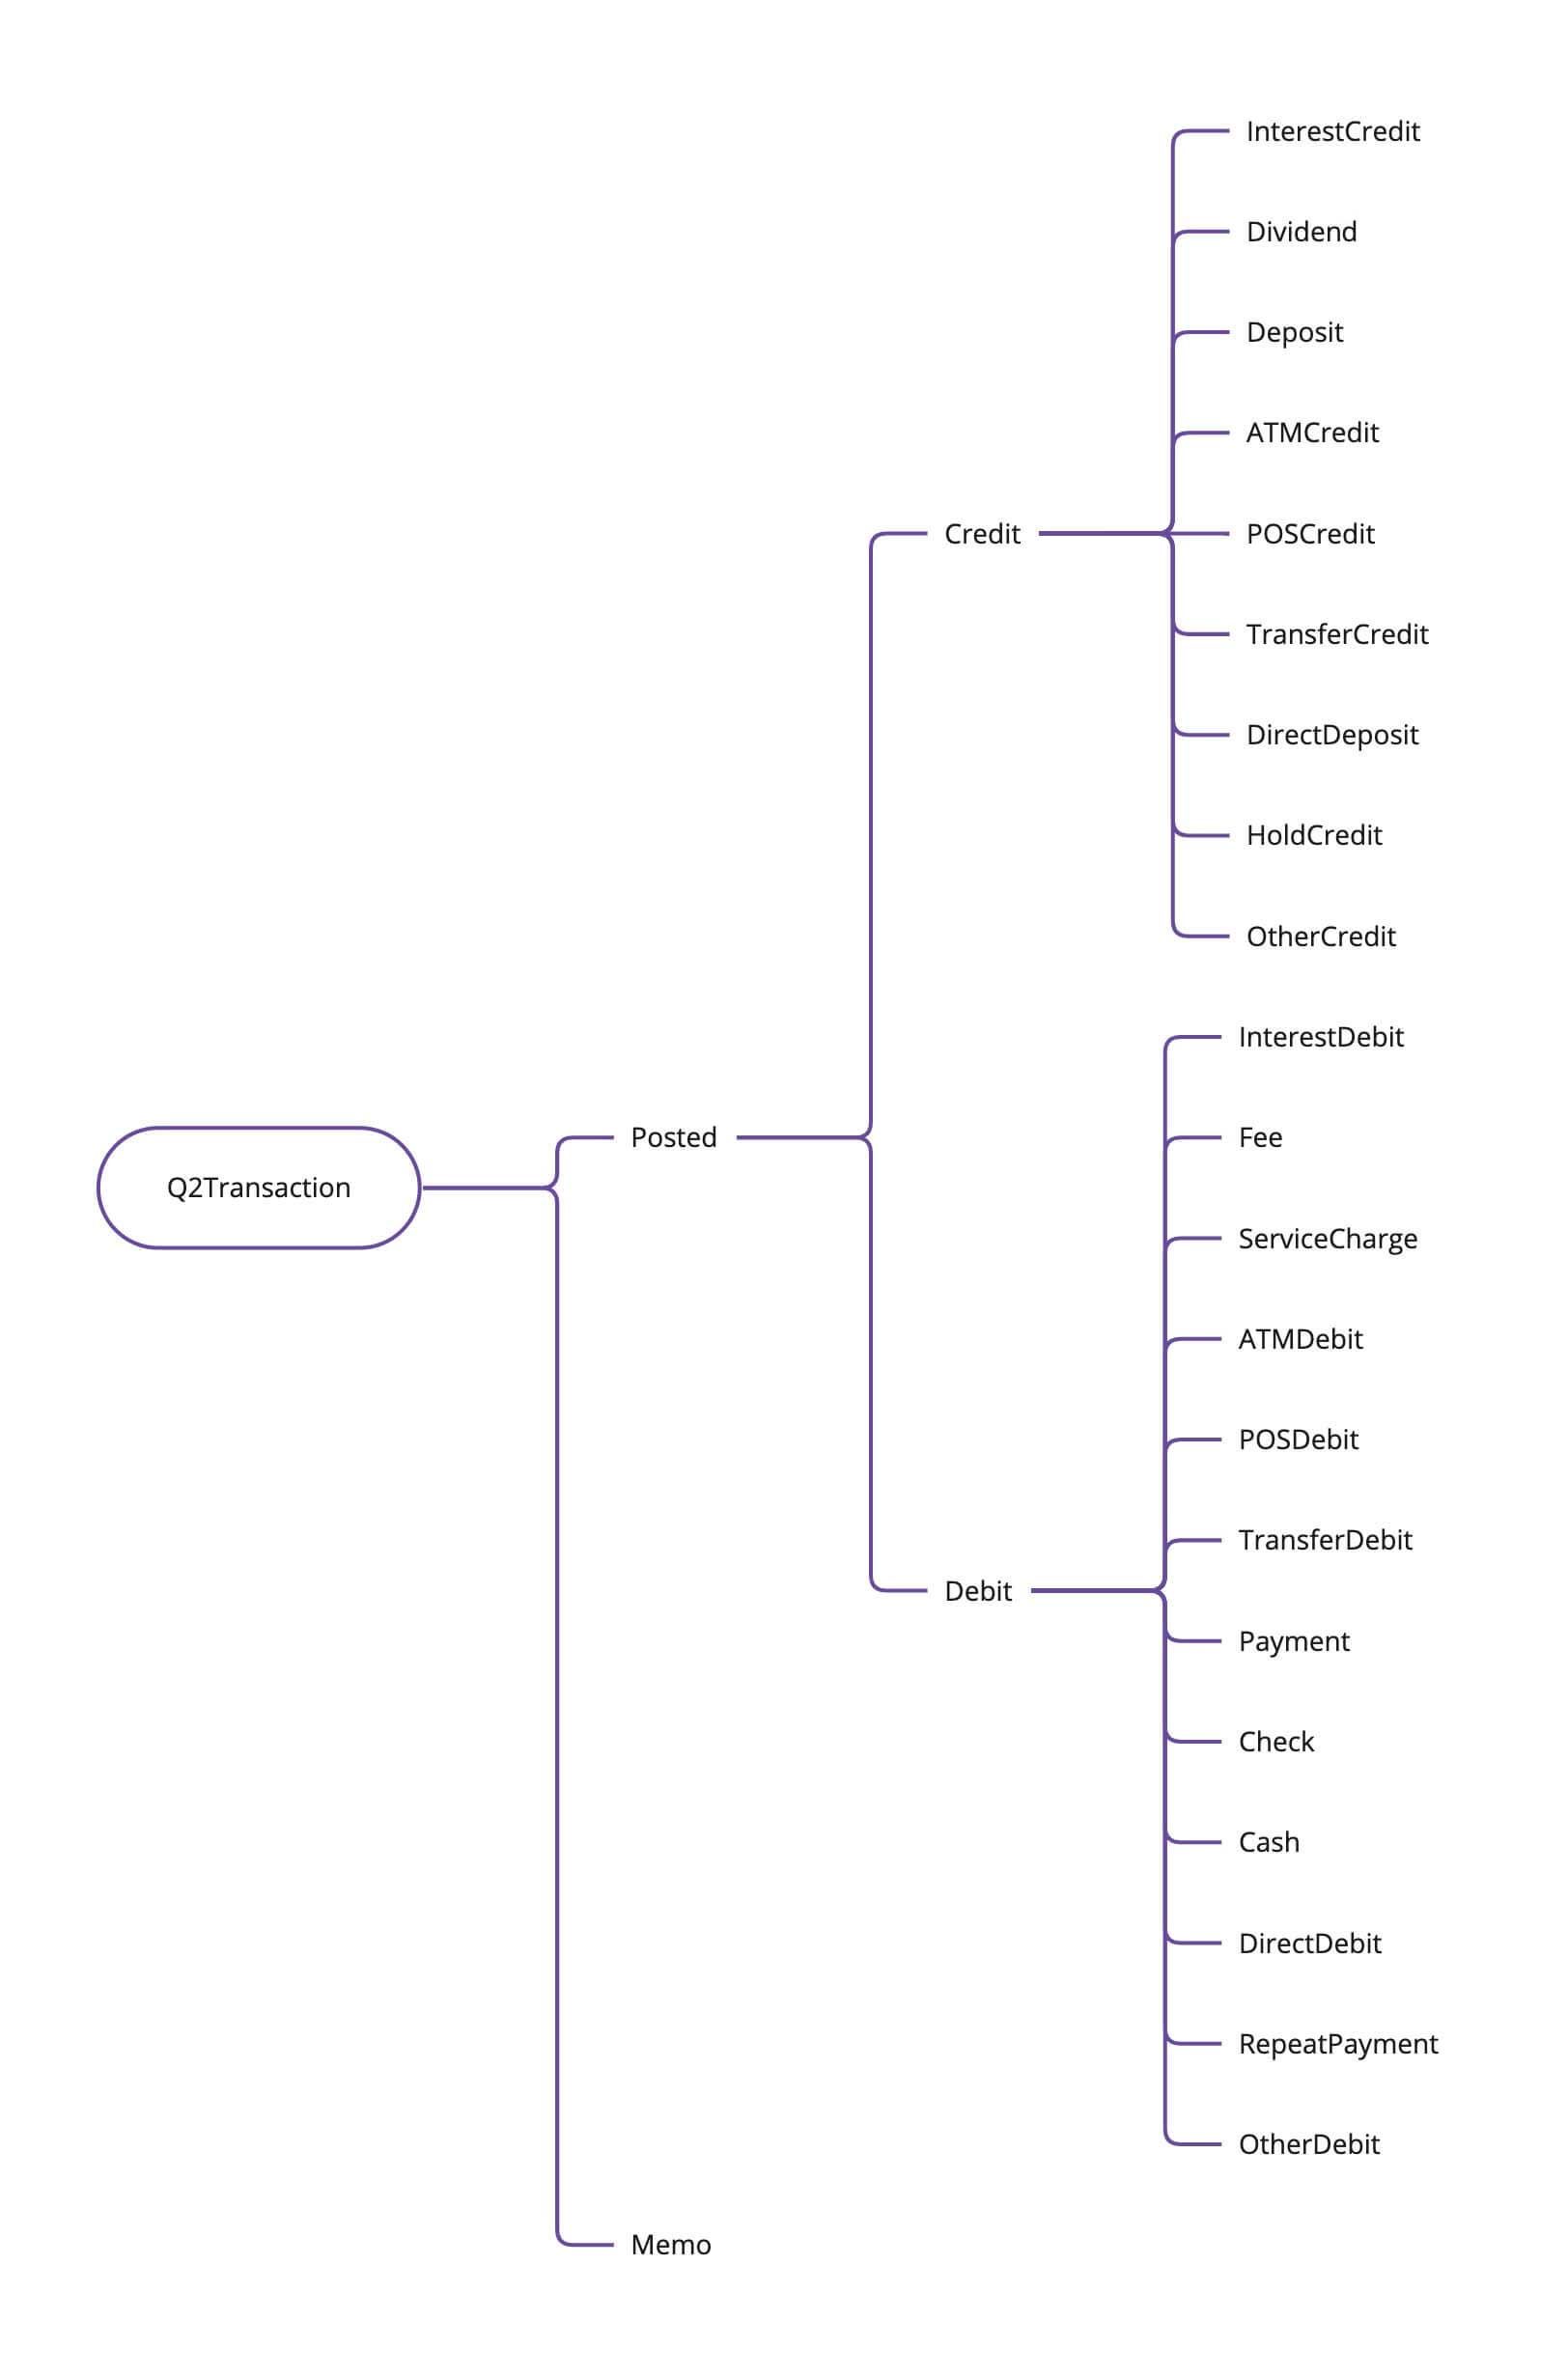
Currently, the only context trees available are UUX's accounts and transactions. We will use accounts for the examples. If you need to make an outlet extendible that isn't in accounts, use context='None'. More trees will be added in the future.
Account Hierarchy
Transaction Hierarchy
Context Types
Using the diagrams above you can specify a particular context for your dropdown option or tab to be visible. For example, if you wanted to only show your tab for Goal accounts, you would specify a context in your tecton config of Account::Goal. Similarly, if you wanted to show your dropdown option for only Debit transactions you would specify Transaction::Debit. You can use any of the options by using the form {contextCategory}::{contextType}.
Additional Context Restrictions
Sometimes these contexts aren't granular enough, so we also have the concept of additionalContextRestrictions. Read more on additionalContextRestrictions and how they are used in our guides on UUX Content Controls.